Struggling with pain or discomfort on your rides? Learn how to adjust your road bike for the perfect fit with these simple tips that boost comfort, prevent injuries, and improve performance.
Do your rides leave you feeling sore or uncomfortable? Maybe you notice pressure in the saddle area, pain in your knees, or tension building in your shoulders, neck, and wrists.
If this sounds familiar, the good news is that most of these issues can be improved with a proper bike fit.
In this guide, we’ll walk through the most important adjustments you can make to your road bike so you can replace those aches with smooth, pain-free miles.
Why Bike Fit Matters
A proper bike fit can be the difference between suffering through every ride and genuinely enjoying your time on two wheels.
Think of it like getting a suit tailored. Off-the-rack clothing can feel awkward until a tailor makes the right adjustments to suit your body.
A bike fit works the same way: by tweaking saddle height, handlebar position, and cleat alignment, your bike becomes an extension of you.
The result? More comfort, fewer injuries, better performance, and a lot more fun on the road.
And remember, bike fit isn’t something you do once and forget. As your body, flexibility, and training goals change, your fit may need updating.
Regular reassessments will keep your setup working for you.
Professional Fit vs. DIY
Should you pay for a professional fit or try it yourself? Both approaches have benefits.
Professional Bike Fit: A trained fitter brings expertise in biomechanics and anatomy. They can spot subtle issues you may miss and fine-tune every detail for maximum efficiency and comfort.
DIY Bike Fit: Doing it yourself saves money and gives you a chance to learn more about your body and riding style. You’ll also know how to make future tweaks. The downside is you might overlook small misalignments that a pro would catch.
Ultimately, the choice depends on your budget, curiosity, and how much time you’re willing to spend dialing things in.
Finding Your Ideal Riding Position
Every rider has different needs, and road bikes allow for three common fit styles:
Aggressive/Race Fit: Designed for maximum aerodynamics. Handlebars are set low, perfect for racers chasing speed.
Endurance/Comfort Fit: Handlebars sit higher, giving you a more upright and relaxed position. Great for long-distance rides without sacrificing comfort.
Balanced/Performance Fit: A middle ground between speed and comfort, ideal for riders who want versatility.
Bike Fitting Basics
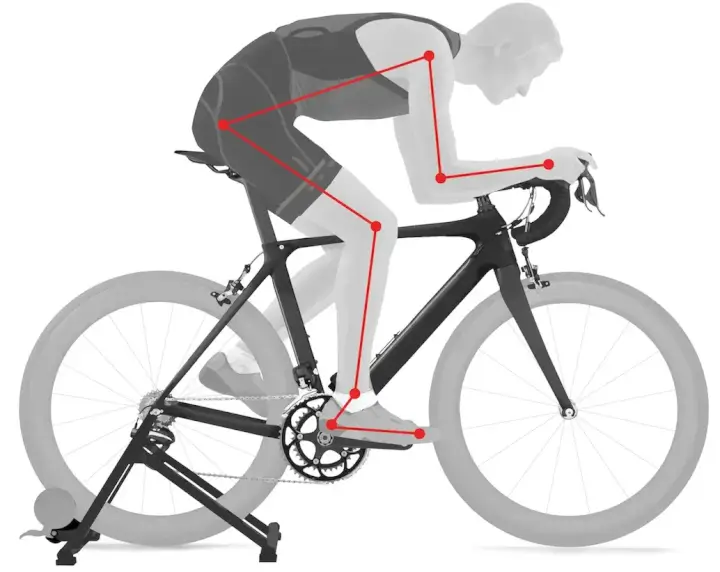
Adjusting Saddle Height
Your saddle height is the foundation of your bike fit. Here’s how to dial it in:
Stand next to your bike and raise the saddle so it’s roughly level with your hip bone.
Hop on a trainer, pedal, and stop with your right foot at the bottom of the stroke (6 o’clock). Your leg should be almost straight, with a slight bend at the knee.
If you’re overreaching, lower the saddle. If your leg isn’t close to full extension, raise it.
Fine-tune in 1–2 mm increments until it feels natural.
Test on the road and keep adjusting if you still feel discomfort.
A properly set saddle height reduces knee pain and helps deliver more power with less effort.
Adjusting Handlebar Height
Handlebar position influences comfort, aerodynamics, and bike control.
Lower bars = more aerodynamic but can strain your back and neck.
Higher bars = more upright comfort but less aerodynamic.
How to Adjust Handlebar Height:
Loosen the stem clamp bolts.
Remove the top cap and slide off the stem.
Add or remove spacers to raise or lower the bars.
Reattach the stem, tighten bolts, and align it with the front wheel.
Many recreational riders prefer bars level with or slightly above the saddle, while racers often set them lower for speed.
Adjusting Handlebar Reach
Reach determines how far you stretch to hold the bars. Too long, and you’ll strain your back and shoulders.
Too short, and you’ll feel cramped.
Ways to Adjust Reach:
Stem Angle: Some stems allow angle adjustments. Tilt up or down slightly until it feels right.
Stem Length: Swap to a shorter stem to bring bars closer, or a longer one to extend reach.
Finding the right balance will improve both stability and comfort on longer rides.
Final Thoughts
Getting your bike fit right may take some trial and error, but once dialed in, it transforms your riding.
A proper setup reduces injuries, boosts performance, and makes every ride more enjoyable.
Whether you choose a professional fit or go the DIY route, the time you invest will pay off with more comfort and confidence on the road.